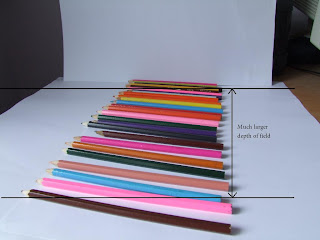
First of all I set out some paper and arranged a row of coloured pencils on it. I set my camera up on it's tripod and took three photos (All three used the orange pencil as the focal point):
 |
| F/2.8 |
This first photo the aperture was set to f/2.8 with 1/38 shutter speed. The result of this gave a very shallow depth of field.
 |
| F/5.6 |
This second photo was set up with the aperture set to f/5.6, which is the halfway point on my particular camera, the shutter speed was 1/8.5. This gave a larger depth of field.
 |
| F/11 |
This final photo was set to my cameras maximum aperture setting of f/11 and the shutter speed was 1/2. This gave the largest depth of field.
I wasn't overly happy with the results partially because my camera offers such a short range of aperture settings and also the subject chosen didn't work very well so I decided to repeat the exercise using a new subject.
For the next subject I chose a garden path which used outside lighting and was longer so I was hoping that the effect would be a lot more obvious. For each photo the focus was set on the grey paving slab.
 |
| F/2.8 |
Settings: F/2.8 1/900sec
Again the depth of field was small.
 |
| F/5.6 |
Settings: F/5.6 1/240 sec
More depth of field than the previous photo.
 |
| F/11 |
Settings: F11 1/60 sec
The largest depth of field achieved from all 3 photos.
So in conclusion large apertures (small F stop numbers) give very small depth of fields whereas the smaller the aperture (larger F stop numbers) the larger the depth of field. Larger apertures would be very useful if you wanted the eye to be drawn to a particular part of a photo for example making a face in a crowd stand out. Smaller apertures are ideal when you want more of the photo sharp like an estate agent would use when photographing someones home.
No comments:
Post a Comment