Wednesday, 28 September 2011

Exercise - Object in different positions in the frame


For this exercise I am asked to find a subject with a large, even background. Whilst at the Weald and Downland open air museum I came across a house that had a large uncluttered wall with a door in it. Using the door as the subject and the brick wall as the large even background I started to take a series of photos.

Photo #1


 Photo #1 is the natural way I would shoot this subject.

Photo #2


Photo #2 is with the subject right in the centre.

Photo #3


Photo #3 is with the subject just off centre.

Photo #4


Photo #4 is with the subject placed in the bottom left corner.


Going through these photos my preference would have to be photo #1 as it is the more natural of the shots.
My second preference would be photo #2 as having the subject right in the middle really draws your attention to it. The background seems to be there just to draw your attention to the door and doesn't clutter up the photo.
Preference 3 would probably be photo #3 for very similar reasons as my second preference. The door is quite clearly the more dominant subject with the background there to enhance it.
Finally, photo #4. Of the four photos this just didn't work for me. It's not clear what the subject is and the background has ceased to become a background and is now quite prominent in the photo. My eye was draw to the door, the windows and the dark roof and I felt an emptiness in the middle of the picture.

Wednesday, 21 September 2011

Exercise - Fitting the frame to the subject.

For this exercise I am asked to find something clear and compact that must be accessible from both near and far. I enjoy photographing old houses and architecture so I chose the Weald and Downland Open air Museum, West Sussex, to look round to see if I could find anything there. The subject I chose to photograph was a beautiful old thatched granary, which I felt fitted the bill very well. Equipment used was Fujifilm S100fs camera, handheld, in aperture mode which was set to F6.4.

Photo #1

Photo #1 is my standard photo, this is how I would normally take this picture (apart from I would normally have the camera set to [AUTO] mode).

Photo #2
Photo #3
Photos #2 and #3 where both my attempts to fit the subject into the whole frame. Photo #2 was fun as the roof seemed to naturally work it's way into the corner and I have never taken photos with the camera tilted before. As a side experiment I decided to crop the grass off left hand side of photo #2 to see if the overall effect would look better.

Photo #2 cropped.


After cropping I found this photo to be a lot more pleasing to look at.


Photo #4
Photo #4 I have moved right up to the building and photographed it so that I can't see any defined edges. This draws your attention to what the subject is composed of and the contrast between the bricks and the oak beams are a lot clearer. Found this the most difficult shot as I am not used to photographing just a part of a subject.

Photo #5
Photo #6
Photo #5 & photo #6 are my attempts at capturing the object with it's surroundings. I prefer photo #6 even though it is really overexposed because the building in the background and the fence really add to the age and setting of this building.

Photo #6 Cropped and edited


I have cropped and edited the levels on photo #6 so that it is more pleasing to my eye. Very happy with this but could possibly have cropped a little more off the right hand side.

Monday, 19 September 2011

Exercise - Panning with different shutter speeds

In this exercise we are asked to take a number of photos using different shutter speeds whilst panning on the chosen object.
The scene is the roadside and the subject is cars. The camera is set to S (shutter priority) and the initial shutter speed is set to 1/4000sec then reduced uniformly to 1/15sec. The results are as follows:

1/4000sec
1/3000sec
1/2000sec
1/1200sec
1/800sec
1/500sec
1/320sec
1/200sec
1/125sec
1/80sec
1/60sec
1/50sec
1/25sec
1/15sec


At this shutter speed the car, background and foreground are all sharp with no evidence of movement. This would be a useful setting for capturing a bee in flight or similar.


Still no movement, everything appears static.


And no movement in this photo also.


Still static.


At last! The foreground is clearly showing signs of motion blur whilst the van is starting to show a little movement on the wheels.


The motion blur is clearly more visible in the background as well as the foreground on this shot. The car is still sharp except the wheels.


The car is starting to look a little less sharp in this one.


Starting to get a real sense of speed now. The motion blur is starting to become a lot more pronounced on the car and the foreground and background are much more out of focus.


This is my favourite of this exercise. There is still a sharpness about the car so you can see exactly what it is yet there is also has enough blur to show that it's moving. The really out of focus for and background really compliment the scene. I will take note of this setting and use it in the future.


Maybe starting to get too much motion blur in the fore and background for my liking on this one.


Really hated this photo until I zoomed in on the wheels. I found the shape it made to be almost a face.


This didn't come out too bad! I suspect that the very dark colour of the van against the over exposed background probably has something to do with it being quite easy to look at.


Here we have reached the stage where the fore/background have become just a streaking blur.


Too much motion blur and over exposed, this is not a very nice photo to look at. Would've benefited from a natural density filter.

Exercise - Shutter speeds

This exercise is to examine how different shutter speeds affect the overall outcome of the photo.
Scene is by the side of the road photographing the cars that go by using a fixed camera on a tripod. Manual focus and an ISO of 400 is initially used. The camera was set to S (shutter priority) and advanced to 1/4000sec (the highest available setting for my camera) for the first photo then reduced as uniformly as possible until we came down to 1/10sec. The results are as follows:

1/4000sec


1/3000sec
1/2000sec
1/1200sec
1/800sex
1/500sec
1/400sec
1/250sec
1/160sec
1/100sec
1/50sec
1/30sec
1/20sec
1/10sec
At this shutter speed the van is seen to be perfectly static, almost as if it's parked. The lack of movement, albeit impressive, just doesn't sit well with this type of photo in my opinion.


Still perfectly still.


I would have to say that this is the slowest shutter speed where the movement is sharply frozen.


This shutter speed is starting to show the tell-tale signs of movement. There is a very slight blurring to the wheels and the car isn't as sharp as previously.


The movement blur is a lot more obvious at this shutter speed.


This shutter speed shows a lot more movement and you are starting to get a real sense of motion.


The writing on the side of this van shows the motion blur a lot more effectively.


The car is starting to elongate in this frame.


This is a very pleasing shot. I think the colour of the car really helps with the overall look of the photo.


Again, good motion blur which is very pleasing to the eye.


This shutter speed shows a real sense of motion and direction and I would have to say that this is my favourite photo of the set.


I have included all of the blown out photos as well. I believe that if I had some natural density filters fitted to my camera they wouldn't have been so overexposed.


Although overexposed this is still quite a satisfying shot. The car is getting almost indistinguishable as a car and is becoming more a slash of colour across the still scene.


This is the lowest setting I could get to and really not happy with this photo at all. It's photos like this that get me very unhappy with the limitations I have with the equipment I use.


Saturday, 17 September 2011

Exercise - Focus at different apertures

This exercise is to show how different apertures affect the overall outcome of a photo.
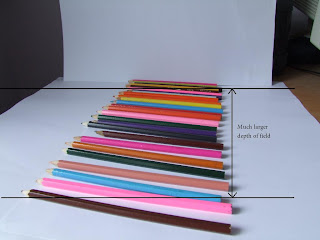
First of all I set out some paper and arranged a row of coloured pencils on it. I set my camera up on it's tripod and took three photos (All three used the orange pencil as the focal point):

F/2.8


This first photo the aperture was set to f/2.8 with 1/38 shutter speed. The result of this gave a very shallow depth of field.


F/5.6


This second photo was set up with the aperture set to f/5.6, which is the halfway point on my particular camera, the shutter speed was 1/8.5. This gave a larger depth of field.


F/11


This final photo was set to my cameras maximum aperture setting of f/11 and the shutter speed was 1/2. This gave the largest depth of field.


I wasn't overly happy with the results partially because my camera offers such a short range of aperture settings and also the subject chosen didn't work very well so I decided to repeat the exercise using a new subject.
For the next subject I chose a garden path which used outside lighting and was longer so I was hoping that the effect would be a lot more obvious. For each photo the focus was set on the grey paving slab.

F/2.8


Settings: F/2.8  1/900sec

Again the depth of field was small.


F/5.6


Settings: F/5.6  1/240 sec

More depth of field than the previous photo.


F/11


Settings: F11  1/60 sec

The largest depth of field achieved from all 3 photos.


So in conclusion large apertures (small F stop numbers) give very small depth of fields whereas the smaller the aperture (larger F stop numbers) the larger the depth of field. Larger apertures would be very useful if you wanted the eye to be drawn to a particular part of a photo for example making a face in a crowd stand out. Smaller apertures are ideal when you want more of the photo sharp like an estate agent would use when photographing someones home.


Friday, 16 September 2011

Exercise - Focus with a set aperture

For this exercise I have created a scene using bottles at different distances from the camera on a black piece of card. I set the camera up on a tripod then set the aperture to the lowest setting (which in this case was f/3.6).


This first photo the focus was on the bottle to the rear which made the other two bottles progressively out of focus the nearer to the camera they got.


This second photo focused on the bottle in the foreground which made the bottles behind progressively more out of focus the further they moved away from the camera.


In this exercise I would have to say that I preferred the first photo focusing on the rear bottle. I like the way that my eye is drawn along the line of out of focus bottles to the sharp bottle in the background and although the first bottle is much larger it is the rear bottle that dominates the picture.
This being said I would probably prefer the second photo under different circumstances - for example a small aperture when doing a portrait which would give a sharp crisp face against a soft background. I am interested to see what results I would get using a small aperture with landscapes. Will have to give that a go at some time.

Thursday, 15 September 2011

Exercise - Focal length and angle of view.
Camera used: Fujifilm S100fs with fixed 400mm lens.

Firstly I needed to find the standard focal length for my camera, the distance at which the viewfinder most closely matches the scene as viewed with the naked eye. After a bit of playing around I found this to be approx 100mm which sounded wrong but I double checked and the result was the same.

Standard - 100mm


This is the photo taken at the standard focal length. When printed out I found that it matched the scene when it was held roughly 67cm away from me.


Wide angle - 28mm


This is the view from the same position when the lens is set to 28mm. When printed and held out in front of me it matched the scene at only 16cm away, a lot closer than the standard setting.


Telephoto - 400mm


For this photo the full telephoto was used @ 400mm. With all three photos the large red ball was the focal point. Again, this photo was printed onto A4 and held in front of me. Using my beautiful assistant Karen I found the distance this time was approx 230cm