In this exercise I am asked to compose 20 photos in vertical format and then take the same photos again but recomposed in the horizontal format. Everything shot has to fit within the frame. Equipment used - Fujifilm S100fs handheld. All photos are unedited unless otherwise stated.
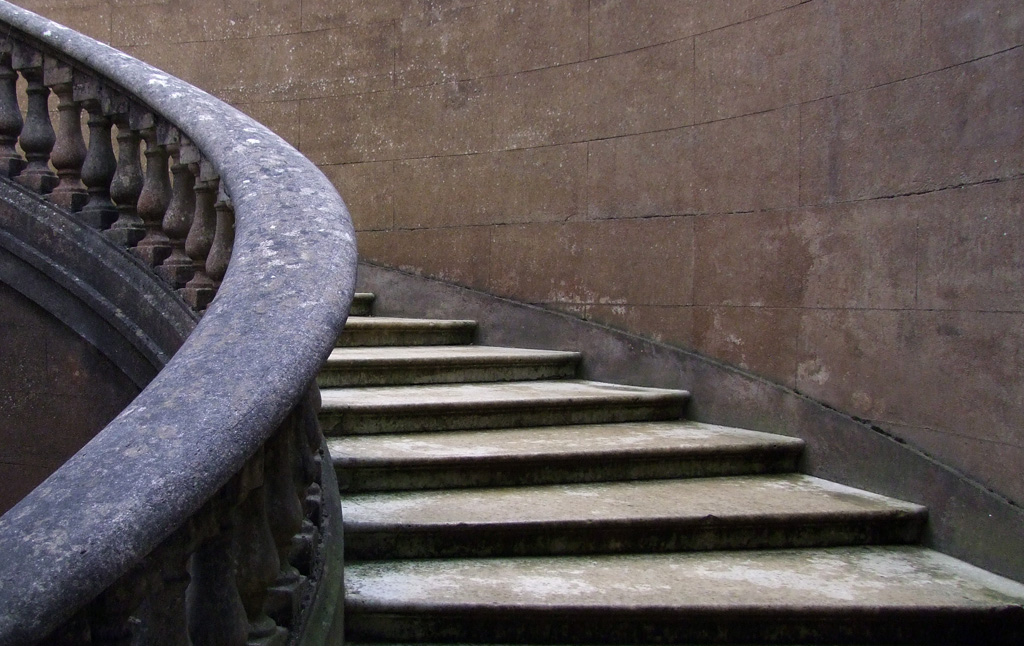
Image 1. Steps.
Image 1 seemed to fit the vertical aspect really well. Really liked the way that where the steps are leading is hidden which leaves the viewer wondering what is on the other side.
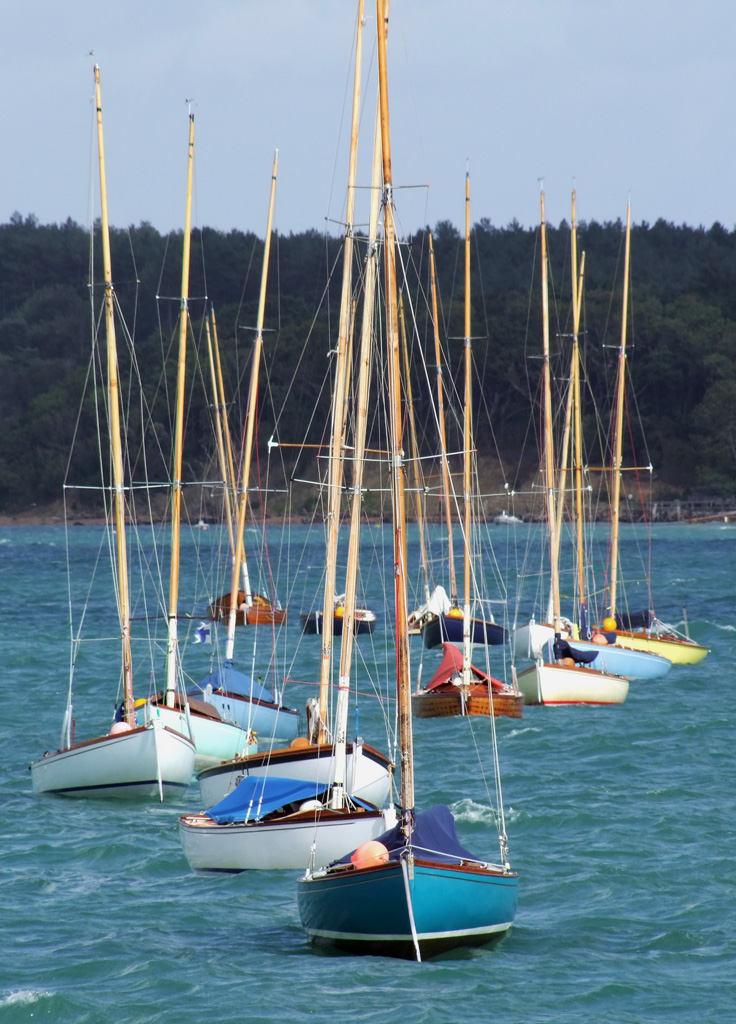
Image 2. Boat on the water.
In this shot I tried to follow the rule of thirds by having the horizon on one line and the boat on the other. Not sure if this shot works vertically as I prefer the horizontal aspect of it, probably because the boats length is horizontal.
Image 3. Breakwater.
I found this breakwater interesting because of the dark contrast it gave to the scene and the upright, weathered structure of it. I could've, and possibly should've, taken a close up of a single post to fill the frame but I found this to be a lot more aesthetically pleasing. The rule of thirds was again in the forefront of my mind when taking this.
Image 4. Boat on shingle.
I found it hard to photograph this boat because it was so dark. If I compensated too much then I overexposed the sky so I hope I've found a happy medium. This shot was inspired by the exercise photo on p.47 where the subject takes up the bottom of the shot. The horizontal version seems to follow the golden section.
Image 5. Old winch and chair.
Really liked this rusty old winch and have been trying to get a decent photo of it for years. Armed with my new knowledge I walked around it with the hope that I could find something to balance it, hence the bench. The vertical view could benefit from cropping to remove the telegraph pole at the top and possibly some of the grass at the bottom.
Image 6. Decayed wooden post.
This is something I just happened across and was struck by the rusty loop around the rotten wooden post. After taking a few vertical shots I settled for this one as the angle of the wooden plank cutting through the photo seemed to work really well. The horizontal version I couldn't get to work quite as well so definitely prefer the vertical aspect of this scene.
Image 7. Plant on beach.
I'm always amazed at how some plants can grow in seemingly inhospitable places, that was what interested me in taking this picture. The blue sky seemed to compliment the colours of the plant, which stood out dramatically against the stones. In the vertical version I used some small plants on the left to try and balance the main plant.
Image 8. Tree.
I took this photo because I liked the way the tree is right on the edge of where it can possibly grow. I had a swamp behind me so was restricted as to where I could stand to take the shot. I think the shot might've worked better at a different time of day as the light is far too harsh. As an experiment I put the subject at the top of the frame. I don't think this photo has worked at all well in either version.
Image 9. Butterfly resting.
A chance encounter and it stayed still long enough for me to get a few shots off. This butterfly was always going to contrast well against it's natural surroundings which gave me more time to think about composure. I really do think the vertical image lends itself to this kind of shot where the flower is as much a part of the composition as the butterfly. I tried to find something to balance the butterfly for the horizontal shot but it flew away.
Image 10. Twitchers.
Going to try and photograph people as much as possible to get used to it, that is why I took this shot. When composing the shot I was conscious of using the rule of thirds, which seemed to fit this particular picture. Not sure which view I prefer as they both appeal , although the vertical shot appears simpler and possibly draws your eye to the subject more.
Image 11. Pathway.
My thoughts about this picture was that a pathway should lend itself to a vertical frame nicely because of it's tendency to lead the eye from bottom to top. The vertical image would benefit from the sky (top left) being cropped out as I find it distracts from the photo. I don't think the horizontal version works as well as there is too much dead space on the left and right of the path.
Image 12. Tree on embankment.
Took a few photos of this vertically before settling on this one. I think the fencepost balances the tree out and there is a hint of the golden section about it. The tree contrasts well against the sky and sits well on the curved bank.
Image 13. Chapel.
This is an interesting building and had to walk round it a few times trying to find a good vertical shot. I decided in the end to have the chapel filling up the top of the shot and used a headstone at the bottom to balance it out. Normally I would never shoot a building vertically but I have found that it actually worked better than the horizontal shot on this occasion.
Image 14. Barrels by a gate.
The only reason I took this photo is because of the stark colour contrast between the barrels and the grass. Took a few pictures before I realized that the scene looked better from a lower perspective. The vertical shot has all the action in the lower part of the frame with a very uninteresting sky dominating the other half. The horizontal version uses the gate to add more depth to the scene.
Image 15. tree lined path.
Saw this and had to photograph it. The height of the trees really punctuates the left hand side and I love the way the path swoops round from the bottom corner and draws your eye into the distance. The horizontal shot was taken using the path as the main subject and using the trees as a curtain to hide what was to the left and to enhance the paths shape and depth.
Image 16. Old farm buildings (abstract)
All the different lines and textures is why I took this photo. This angle seemed to frame the vertical aspect well but I wish I had increased the aperture to get a bigger depth of field as I don't like the stone wall closest to the camera being out of focus. The vertical view works so much better than the horizontal with this shot.
Image 17. Toothbrushes.
The thinking behind this shot was that because of the layout it should fill a vertical frame quite well. Had to adjust the white balance to get rid of an awful blue/green cast. Tried a lot of angles but nothing really appealed, as such not overly impressed with these shots.
Image 18. Potted plant.
This plant and pot filled the vertical frame nicely and contrast quite well against the blue background. One criticism is that I should've trimmed back the dead tips on the leaves. I found the horizontal shot very difficult to look any good.
Image 19. Teddy.
This teddy is very special to me which is why I photographed it. The vertical framing works perfectly here because it's obvious as to what the subject is, whereas, in the horizontal framing the trellis in the background is a distraction. It's a shame because I liked the way the shadows framed the horizontal version.
Image 20. Signpost.
Took this shot based purely on the height of the signpost and thought it would lend itself to a vertical shot. Had to burn the signpost using Photoshop otherwise it looked too highlighted. For the horizontal view I tried to incorporate the path but failed miserably!
Throughout this exercise I tried my hardest to incorporate what I have already learned. Some pictures follow the rule of thirds, some the golden section and others have balance within them. I found the exercise difficult as holding the camera to get vertical shots felt awkward, I am, however, happy with some of the results I achieved. I noticed that I went around looking for scenes/objects which would go well within a vertical frame and the horizontal aspect was not immediately obvious.